Cal.com
Scheduling infrastructure for absolutely everyone.
Cal.com
The open-source Calendly successor.
Discussions
·
Website
·
Issues
·
Roadmap
About the Project
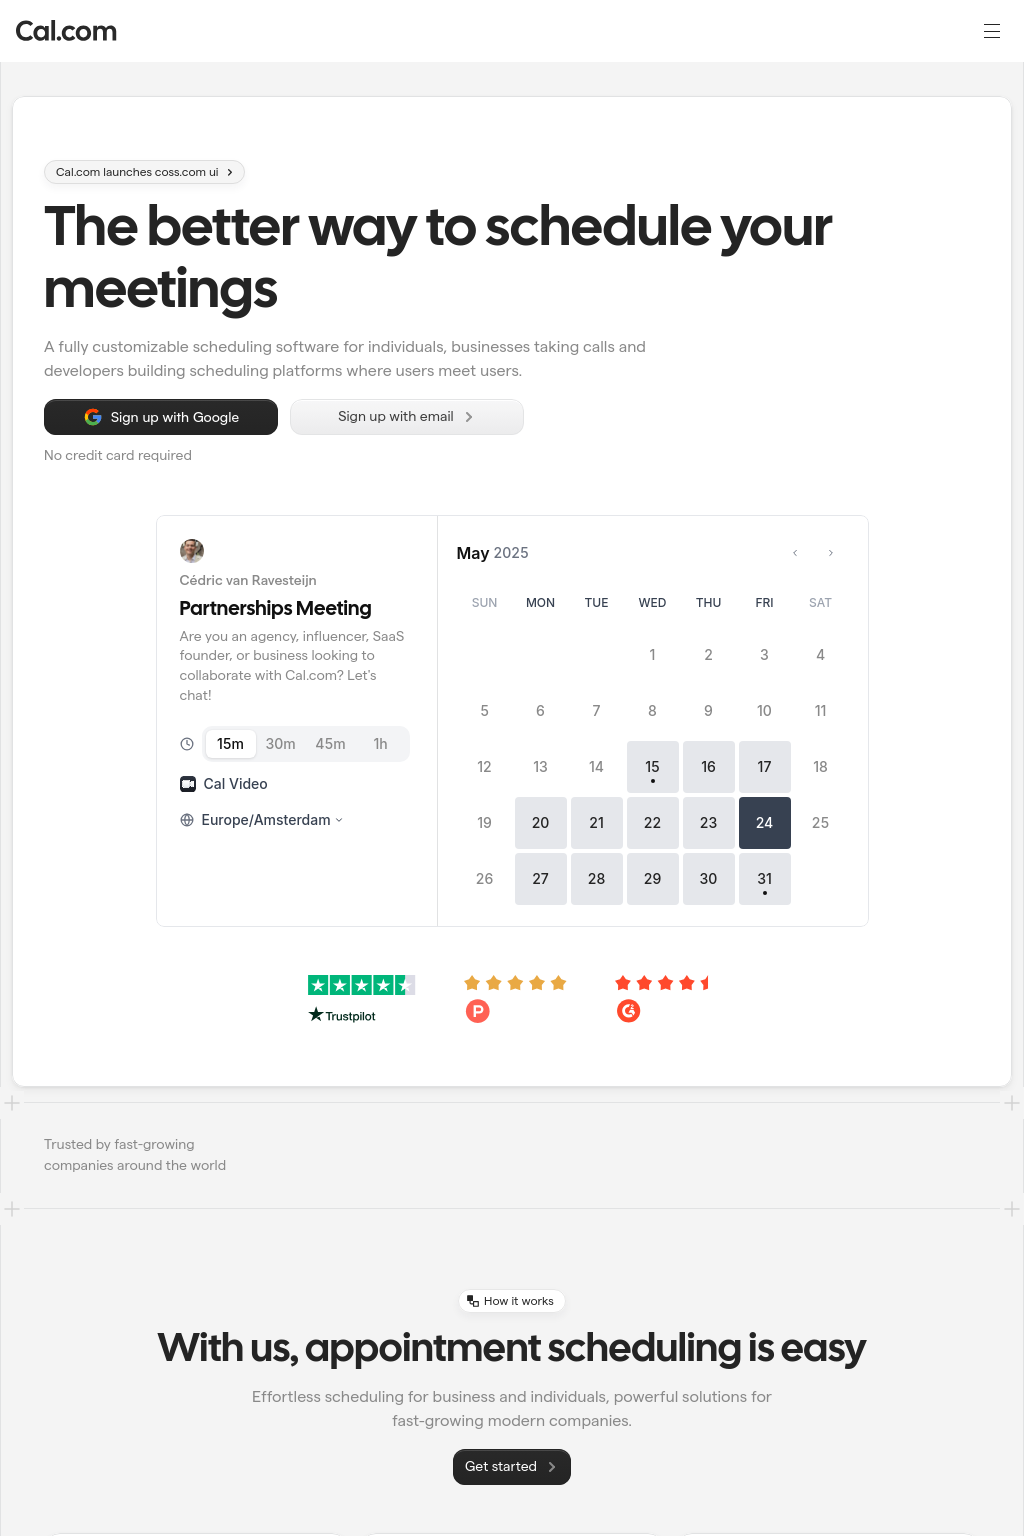
Scheduling infrastructure for absolutely everyone
The open source Calendly successor. You are in charge
of your own data, workflow, and appearance.
Calendly and other scheduling tools are awesome. It made our lives massively easier. We're using it for business meetings, seminars, yoga classes, and even calls with our families. However, most tools are very limited in terms of control and customization.
That's where Cal.com comes in. Self-hosted or hosted by us. White-label by design. API-driven and ready to be deployed on your own domain. Full control of your events and data.
Recognition
Hacker News
Product Hunt
This project is tested with browserstack
Built With
- Next.js
- tRPC
- React.js
- Tailwind CSS
- Prisma.io
- Daily.co
Stay Up-to-Date
Cal.com officially launched as v.1.0 on the 15th of September 2021 and we've come a long way so far. Watch releases of this repository to be notified of future updates:
Getting Started
To get a local copy up and running, please follow these simple steps.
Prerequisites
Here is what you need to be able to run Cal.com.
- Node.js (Version: >=18.x)
- PostgreSQL (Version: >=13.x)
- Yarn (recommended)
If you want to enable any of the available integrations, you may want to obtain additional credentials for each one. More details on this can be found below under the integrations section.
Development
Setup
- Clone the repo into a public GitHub repository (or fork https://github.com/calcom/cal.com/fork). If you plan to distribute the code, keep the source code public to comply with AGPLv3. To clone in a private repository, acquire a commercial license
git clone https://github.com/calcom/cal.com.git
If you are on Windows, run the following command on
gitbashwith admin privileges:git clone -c core.symlinks=true https://github.com/calcom/cal.com.git
See docs for more details.
- Go to the project folder
cd cal.com
- Install packages with yarn
yarn
- Set up your
.envfile
- Duplicate
.env.exampleto.env - Use
openssl rand -base64 32to generate a key and add it underNEXTAUTH_SECRETin the.envfile. - Use
openssl rand -base64 32to generate a key and add it underCALENDSO_ENCRYPTION_KEYin the.envfile.
- Setup Node
If your Node version does not meet the project's requirements as instructed by the docs, "nvm" (Node Version Manager) allows using Node at the version required by the project:
nvm use
You first might need to install the specific version and then use it:
nvm install && nvm use
You can install nvm from here.
Quick start with yarn dx
- Requires Docker and Docker Compose to be installed
- Will start a local Postgres instance with a few test users - the credentials will be logged in the console
yarn dx
Development tip
Add
export NODE_OPTIONS=“--max-old-space-size=16384”to your shell script to increase the memory limit for the node process. Alternatively, you can run this in your terminal before running the app. Replace 16384 with the amount of RAM you want to allocate to the node process.Add
NEXT_PUBLIC_LOGGER_LEVEL={level}to your .env file to control the logging verbosity for all tRPC queries and mutations.
Where {level} can be one of the following:
0 for silly
1 for trace
2 for debug
3 for info
4 for warn
5 for error
6 for fatal
When you set NEXT_PUBLIC_LOGGER_LEVEL={level} in your .env file, it enables logging at that level and higher. Here's how it works:
The logger will include all logs that are at the specified level or higher. For example: \
- If you set
NEXT_PUBLIC_LOGGER_LEVEL=2, it will log from level 2 (debug) upwards, meaning levels 2 (debug), 3 (info), 4 (warn), 5 (error), and (fatal) will be logged. \ - If you set
NEXT_PUBLIC_LOGGER_LEVEL=3, it will log from level 3 (info) upwards, meaning levels 3 (info), 4 (warn), 5 (error), and 6 (fatal) will be logged, but level 2 (debug) and level 1 (trace) will be ignored. \
echo 'NEXT_PUBLIC_LOGGER_LEVEL=3' >> .env
for Logger level to be set at info, for example.
Gitpod Setup
Click the button below to open this project in Gitpod.
This will open a fully configured workspace in your browser with all the necessary dependencies already installed.
Manual setup
- Configure environment variables in the
.envfile. Replace<user>, ``,<db-host>, and<db-port>with their applicable values
DATABASE_URL='postgresql://<user>:@<db-host>:<db-port>'
If you don't know how to configure the DATABASE_URL, then follow the steps here to create a quick local DB
Download and install postgres in your local (if you don't have it already).
Create your own local db by executing
createDB <DB name>Now open your psql shell with the DB you created:
psql -h localhost -U postgres -d <DB name>Inside the psql shell execute
\conninfo. And you will get the following info.Now extract all the info and add it to your DATABASE_URL. The url would look something like this
postgresql://postgres:postgres@localhost:5432/Your-DB-Name. The port is configurable and does not have to be 5432.
If you don't want to create a local DB. Then you can also consider using services like railway.app, Northflank or render.
- Setup postgres DB with railway.app
- Setup postgres DB with Northflank
- Setup postgres DB with render
Copy and paste your
DATABASE_URLfrom.envto.env.appStore.Set up the database using the Prisma schema (found in
packages/prisma/schema.prisma)
In a development environment, run:
yarn workspace @calcom/prisma db-migrate
In a production environment, run:
yarn workspace @calcom/prisma db-deploy
- Run mailhog to view emails sent during development
NOTE: Required when
E2E_TEST_MAILHOG_ENABLEDis "1"
docker pull mailhog/mailhog
docker run -d -p 8025:8025 -p 1025:1025 mailhog/mailhog
- Run (in development mode)
yarn dev
Setting up your first user
Approach 1
- Open Prisma Studio to look at or modify the database content:
yarn db-studio
- Click on the
Usermodel to add a new user record. - Fill out the fields
email,username,password, and setmetadatato empty{}(remembering to encrypt your password with BCrypt) and clickSave 1 Recordto create your first user.New users are set on a
TRIALplan by default. You might want to adjust this behavior to your needs in thepackages/prisma/schema.prismafile. - Open a browser to http://localhost:3000 and login with your just created, first user.
Approach 2
Seed the local db by running
cd packages/prisma
yarn db-seed
The above command will populate the local db with dummy users.
E2E-Testing
Be sure to set the environment variable NEXTAUTH_URL to the correct value. If you are running locally, as the documentation within .env.example mentions, the value should be http://localhost:3000.
# In a terminal just run:
yarn test-e2e

# To open the last HTML report run:
yarn playwright show-report test-results/reports/playwright-html-report
Resolving issues
E2E test browsers not installed
Run npx playwright install to download test browsers and resolve the error below when running yarn test-e2e:
Executable doesn't exist at /Users/alice/Library/Caches/ms-playwright/chromium-1048/chrome-mac/Chromium.app/Contents/MacOS/Chromium
Upgrading from earlier versions
- Pull the current version:
git pull
- Check if dependencies got added/updated/removed
yarn
- Apply database migrations by running one of the following commands:
In a development environment, run:
yarn workspace @calcom/prisma db-migrate
(This can clear your development database in some cases)
In a production environment, run:
yarn workspace @calcom/prisma db-deploy
- Check for
.envvariables changes
yarn predev
- Start the server. In a development environment, just do:
yarn dev
For a production build, run for example:
yarn build
yarn start
- Enjoy the new version.
Deployment
Docker
Official support: Our team will begin to officially support the Dockerfile and docker-compose resources in this
repository.
Important: Cal.com will not be supporting installations that use these Docker resources. While we provide and maintain the Docker configurations, support for Docker-based installations is the responsibility of the user.
This image can be found on DockerHub at https://hub.docker.com/r/calcom/cal.com.
Note for ARM Users: Use the {version}-arm suffix for pulling images. Example: docker pull calcom/cal.com:v5.6.19-arm.
Requirements
Make sure you have docker & docker compose installed on the server / system. Both are installed by most docker utilities, including Docker Desktop and Rancher Desktop.
Note: docker compose without the hyphen is now the primary method of using docker-compose, per the Docker documentation.
(Most users) Running Cal.com with Docker Compose
If you are evaluating Cal.com or running with minimal to no modifications, this option is for you.
- Clone calcom/cal.com
git clone --recursive https://github.com/calcom/cal.com.git
- Change into the directory
cd cal.com
- Prepare your configuration: Rename
.env.exampleto.envand then update.env
cp .env.example .env
Most configurations can be left as-is, but for configuration options see Important Run-time variables below.
Push Notifications (VAPID Keys)
If you see an error like:
Error: No key set vapidDetails.publicKey
This means your environment variables for Web Push are missing.
You must generate and set NEXT_PUBLIC_VAPID_PUBLIC_KEY and VAPID_PRIVATE_KEY.
Generate them with:
npx web-push generate-vapid-keys
Then update your .env file:
NEXT_PUBLIC_VAPID_PUBLIC_KEY=your_public_key_here
VAPID_PRIVATE_KEY=your_private_key_here
Do not commit real keys to .env.example — only placeholders.
Update the appropriate values in your .env file, then proceed.
- (optional) Pre-Pull the images by running the following command:
docker compose pull
This will use the default image locations as specified by image: in the docker-compose.yaml file.
Note: To aid with support, by default Scarf.sh is used as registry proxy for download metrics.
- Start Cal.com via docker compose
(Most basic users, and for First Run) To run the complete stack, which includes a local Postgres database, Cal.com web app, and Prisma Studio:
docker compose up -d
To run Cal.com web app and Prisma Studio against a remote database, ensure that DATABASE_URL is configured for an available database and run:
docker compose up -d calcom studio
To run only the Cal.com web app, ensure that DATABASE_URL is configured for an available database and run:
docker compose up -d calcom
Note: to run in attached mode for debugging, remove -d from your desired run command.
- Open a browser to http://localhost:3000, or your defined NEXT_PUBLIC_WEBAPP_URL. The first time you run Cal.com, a setup wizard will initialize. Define your first user, and you're ready to go!
Updating Cal.com
- Stop the Cal.com stack
docker compose down
- Pull the latest changes
docker compose pull
- Update env vars as necessary.
- Re-start the Cal.com stack
docker compose up -d
(Advanced users) Build and Run Cal.com
- Clone calcom/docker.
git clone https://github.com/calcom/cal.com.git calcom-docker
- Change into the directory
cd calcom-docker
- Update the calcom submodule. This project depends on the Cal.com source code, which is included here as a Git submodule. To make sure you get everything you need, update the submodule with the command below.
git submodule update --remote --init
Note: DO NOT use recursive submodule update, otherwise you will receive a git authentication error.
- Rename
.env.exampleto.envand then update.env
For configuration options see Build-time variables below. Update the appropriate values in your .env file, then proceed.
- Build the Cal.com docker image:
Note: Due to application configuration requirements, an available database is currently required during the build process.
a) If hosting elsewhere, configure the DATABASE_URL in the .env file, and skip the next step
b) If a local or temporary database is required, start a local database via docker compose.
docker compose up -d database
- Build Cal.com via docker compose (DOCKER_BUILDKIT=0 must be provided to allow a network bridge to be used at build time. This requirement will be removed in the future)
DOCKER_BUILDKIT=0 docker compose build calcom
- Start Cal.com via docker compose
(Most basic users, and for First Run) To run the complete stack, which includes a local Postgres database, Cal.com web app, and Prisma Studio:
docker compose up -d
To run Cal.com web app and Prisma Studio against a remote database, ensure that DATABASE_URL is configured for an available database and run:
docker compose up -d calcom studio
To run only the Cal.com web app, ensure that DATABASE_URL is configured for an available database and run:
docker compose up -d calcom
Note: to run in attached mode for debugging, remove -d from your desired run command.
- Open a browser to http://localhost:3000, or your defined NEXT_PUBLIC_WEBAPP_URL. The first time you run Cal.com, a setup wizard will initialize. Define your first user, and you're ready to go!
Configuration
Important Run-time variables
These variables must also be provided at runtime
| Variable | Description | Required | Default |
|---|---|---|---|
| DATABASE_URL | database url with credentials - if using a connection pooler, this setting should point there | required | postgresql://unicorn_user:magical_password@database:5432/calendso |
| CALCOM_LICENSE_KEY | Enterprise License Key | optional | |
| NEXT_PUBLIC_WEBAPP_URL | Base URL of the site. NOTE: if this value differs from the value used at build-time, there will be a slight delay during container start (to update the statically built files). | optional | http://localhost:3000 |
| NEXTAUTH_URL | Location of the auth server. By default, this is the Cal.com docker instance itself. | optional | {NEXT_PUBLIC_WEBAPP_URL}/api/auth |
| NEXTAUTH_SECRET | must match build variable | required | secret |
| CALENDSO_ENCRYPTION_KEY | must match build variable | required | secret |
Build-time variables
If building the image yourself, these variables must be provided at the time of the docker build, and can be provided by updating the .env file. Currently, if you require changes to these variables, you must follow the instructions to build and publish your own image.
Updating these variables is not required for evaluation, but is required for running in production. Instructions for generating variables can be found in the Cal.com instructions
| Variable | Description | Required | Default |
|---|---|---|---|
| DATABASE_URL | database url with credentials - if using a connection pooler, this setting should point there | required | postgresql://unicorn_user:magical_password@database:5432/calendso |
| MAX_OLD_SPACE_SIZE | Needed for Nodejs/NPM build options | required | 4096 |
| NEXT_PUBLIC_LICENSE_CONSENT | license consent - true/false | required | |
| NEXTAUTH_SECRET | Cookie encryption key | required | secret |
| CALENDSO_ENCRYPTION_KEY | Authentication encryption key | required | secret |
| NEXT_PUBLIC_WEBAPP_URL | Base URL injected into static files | optional | http://localhost:3000 |
| NEXT_PUBLIC_WEBSITE_TERMS_URL | custom URL for terms and conditions website | optional | https://cal.com/terms |
| NEXT_PUBLIC_WEBSITE_PRIVACY_POLICY_URL | custom URL for privacy policy website | optional | https://cal.com/privacy |
| NEXT_PUBLIC_API_V2_URL | URL for the v2 API, only required for custom integrations or custom booking experiences using Cal.com Platform | optional | |
| CALCOM_TELEMETRY_DISABLED | Allow Cal.com to collect anonymous usage data (set to 1 to disable) |
optional | |
| NEXT_PUBLIC_SINGLE_ORG_SLUG | Required if ORGANIZATIONS_ENABLED is true | optional | |
| ORGANIZATIONS_ENABLED | Used for Enterprise or Organizations plan | optional |
Troubleshooting
SSL edge termination
If running behind a load balancer which handles SSL certificates, you will need to add the environmental variable NODE_TLS_REJECT_UNAUTHORIZED=0 to prevent requests from being rejected. Only do this if you know what you are doing and trust the services/load-balancers directing traffic to your service.
Failed to commit changes: Invalid 'prisma.user.create()'
Certain versions may have trouble creating a user if the field metadata is empty. Using an empty json object {} as the field value should resolve this issue. Also, the id field will autoincrement, so you may also try leaving the value of id as empty.
CLIENT_FETCH_ERROR
If you experience this error, it may be the way the default Auth callback in the server is using the WEBAPP_URL as a base url. The container does not necessarily have access to the same DNS as your local machine, and therefor needs to be configured to resolve to itself. You may be able to correct this by configuring NEXTAUTH_URL=http://localhost:3000/api/auth, to help the backend loop back to itself.
docker-calcom-1 | @calcom/web:start: [next-auth][error][CLIENT_FETCH_ERROR]
docker-calcom-1 | @calcom/web:start: https://next-auth.js.org/errors#client_fetch_error request to http://testing.localhost:3000/api/auth/session failed, reason: getaddrinfo ENOTFOUND testing.localhost {
docker-calcom-1 | @calcom/web:start: error: {
docker-calcom-1 | @calcom/web:start: message: 'request to http://testing.localhost:3000/api/auth/session failed, reason: getaddrinfo ENOTFOUND testing.localhost',
docker-calcom-1 | @calcom/web:start: stack: 'FetchError: request to http://testing.localhost:3000/api/auth/session failed, reason: getaddrinfo ENOTFOUND testing.localhost\n' +
docker-calcom-1 | @calcom/web:start: ' at ClientRequest.<anonymous> (/calcom/node_modules/next/dist/compiled/node-fetch/index.js:1:65756)\n' +
docker-calcom-1 | @calcom/web:start: ' at ClientRequest.emit (node:events:513:28)\n' +
docker-calcom-1 | @calcom/web:start: ' at ClientRequest.emit (node:domain:489:12)\n' +
docker-calcom-1 | @calcom/web:start: ' at Socket.socketErrorListener (node:_http_client:494:9)\n' +
docker-calcom-1 | @calcom/web:start: ' at Socket.emit (node:events:513:28)\n' +
docker-calcom-1 | @calcom/web:start: ' at Socket.emit (node:domain:489:12)\n' +
docker-calcom-1 | @calcom/web:start: ' at emitErrorNT (node:internal/streams/destroy:157:8)\n' +
docker-calcom-1 | @calcom/web:start: ' at emitErrorCloseNT (node:internal/streams/destroy:122:3)\n' +
docker-calcom-1 | @calcom/web:start: ' at processTicksAndRejections (node:internal/process/task_queues:83:21)',
docker-calcom-1 | @calcom/web:start: name: 'FetchError'
docker-calcom-1 | @calcom/web:start: },
docker-calcom-1 | @calcom/web:start: url: 'http://testing.localhost:3000/api/auth/session',
docker-calcom-1 | @calcom/web:start: message: 'request to http://testing.localhost:3000/api/auth/session failed, reason: getaddrinfo ENOTFOUND testing.localhost'
docker-calcom-1 | @calcom/web:start: }